Videos in the Classroom
Videos have so many amazing applications in the classroom. And it's so easy to create one that even I can do it. As for students, I suspect that many kids will say more about a subject than they would be willing to write about it. Who among us hasn't had writer's block from looking at a piece of paper? There are also a lot of kids who hate the physical act of writing with a pencil, and taking that away chore frees them to share their thoughts. Of course they need to practice writing, but it's ok to separate writing from sharing thoughts once in a while. Teachers can use videos to share student work with the class as a group. And yes, you can still put student work on the wall when it is a video by using a QR code (I have just recently discovered QR codes, and I love them!) Videos are useful for students who are shy or selectively mute, because it removes a lot of the pressure of performing in front of a group. They can practice and re-record until they get their video just right. And a child who was once too terrified to talk in front of a group will proudly stand in front of the group and show his or her video. Videos can help English Language Learners by allowing them to practice, and giving them a meaningful reason to use language.Adobe Spark
 Adobe Spark is a great application that allows you to make videos, posters, or web pages. The web pages are stunning. Here is an example of a teacher who made a resume with a web page. (Now I feel like I need to up my resume game). This week, I made a video, and it was ridiculously easy. I even embedded a video within my video. Adobe Spark could easily be used by students, and it can be connected with Google Classroom. You can pick a template, or just create your own. There are stock photos, icons, and music to use, and I even found a corgi icon (you will see in my video). The voice recording for each page is done separately, so editing it is easy. You can use it on a computer, tablet or smartphone. I like this flexibility of using any device, because it is more likely that a student will have one of these things at home. On the computer, all three types of product can be created on the website. On devices, there are three separate apps: Spark Page, Spark Post, and Spark Video. The only problem I had was most likely caused by my computer. I would complete a recording for a page, but when I played it back, it would cut off a second of my voice. So I downloaded the app on my iPhone and had no more problems with recording.
 Introduction Video
It was difficult to decide what to make because I found this amazing collection of lesson plans to use with Adobe Spark. (They also have free courses for teachers to learn about using Adobe Spark). The lesson plans are great examples of how students can use this, but also how teachers use it to deliver the assignment. To see what I'm talking about, here is a lesson on Landform Vocabulary. The teacher uses a video to deliver the assignment, and the students create a poster for their work. Here is another assignment where students take a picture of a shape in the environment, and then calculate the area of the shape. This is a great real-world connection to content.
I decided to make a teacher introduction video to share a little information about myself with students. I also made it into an assignment for students. I think it is important for teachers to share who we are with our students, and to learn a little more about the students. It also builds community when students learn about each other. Here is a good resource for ideas on student videos to build community, and here is another resource.
This is the video I made, and here is a direct link to the video.
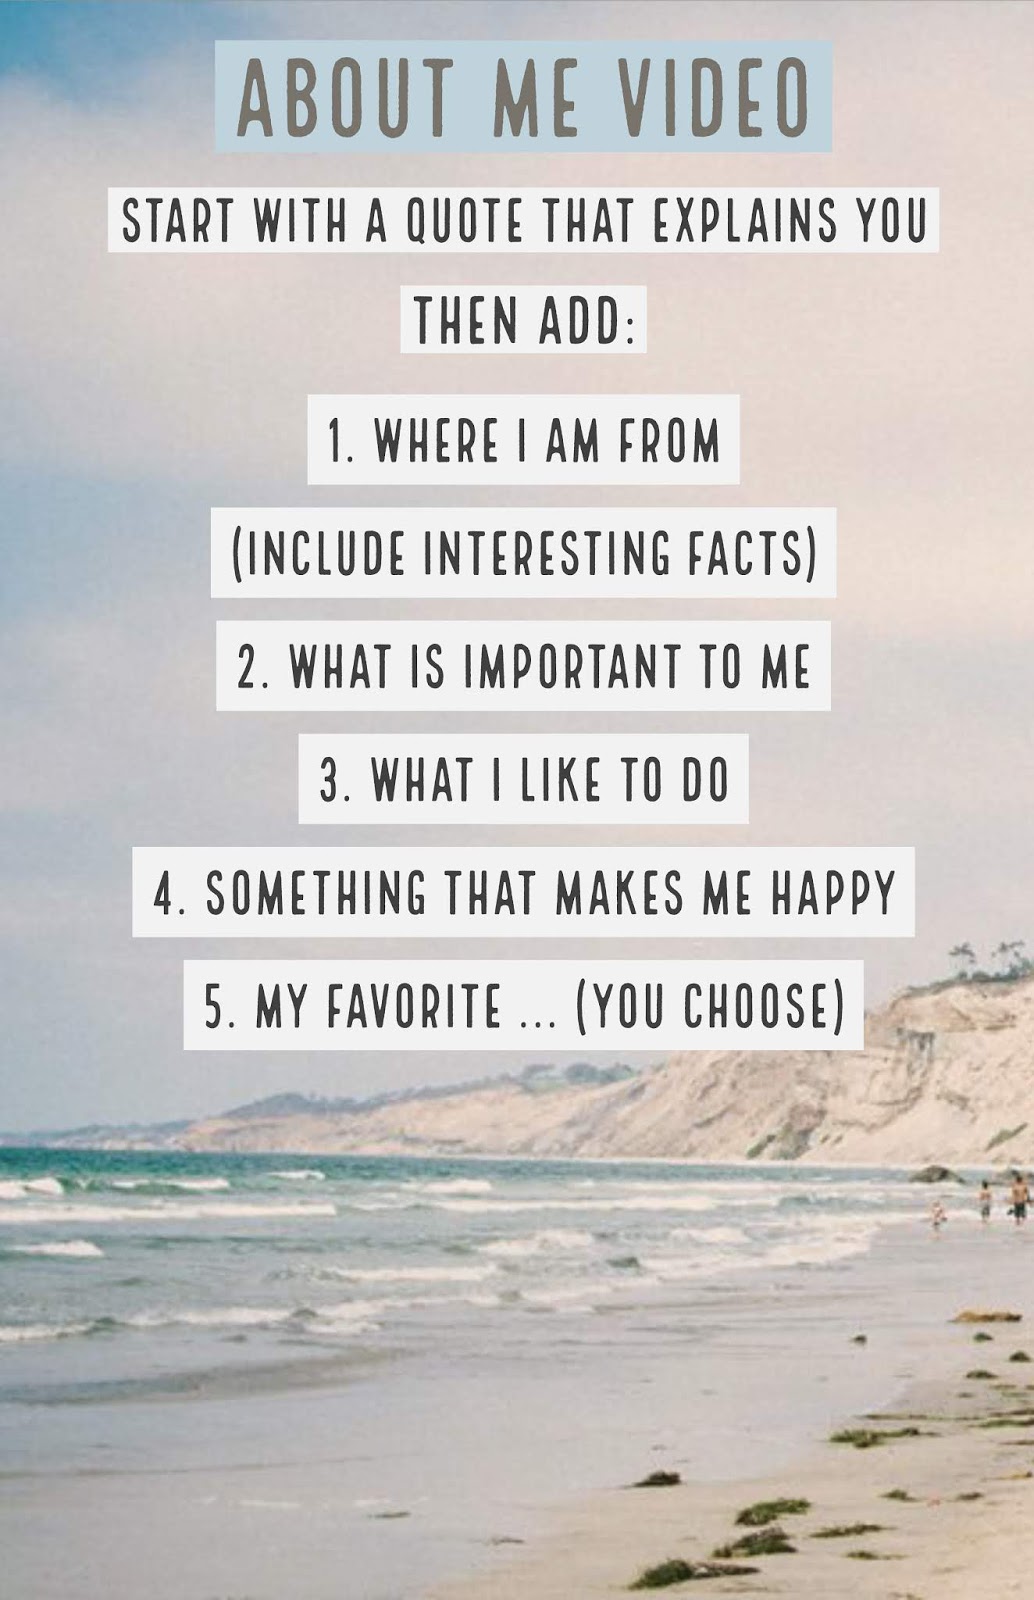
This is the poster I made to share the assignment with students, and here is a direct link to the poster.
Conclusion
As with most technology, it took a little bit of time upfront to create my video. But this is something I will be able to use year after year. Making changes in the future will be very easy. The possibilities are endless for this platform, and I definitely see myself using it frequently.
You accomplish so much in this blog post and I love the examples you post. The inclusion of all of the resources forced me to read it twice and I may have to read it a third time to take it all in.
ReplyDeleteI actually worried about whether it was too much, but when I find a good resource, I have a hard time not sharing it!
DeleteReally enjoyed your video. I too have been in school for what seems like forever. After completing my B.S. in Accounting, I was in law school for a while that also included MBA work and now this. I am so thankful that this is my last semester! Love the pics of your dog and if you every what the best cupcakes in NOVA, try JOY JOY Sweets!!!
ReplyDeleteThanks for the recommendation, Randy. I will definitely try it!
Delete